The Hidden Engineering of Click Systems: A Modern Marvel Beneath Your Feet
Click flooring describes engineered planks or tiles whose precision‑cut edges lock together to form a floating surface. A mechanical interlock paired with protective wear layers gives you a floor that’s quick to fit, easy to repair and often installs without full‑spread adhesive. In this guide we explain how different click profiles work, why a floating fit matters for dimensional stability, and how modern materials — from LVT to engineered wood — use click technology to balance durability, water resistance and speed of installation. If you’re comparing click systems or unsure what suits a kitchen, bathroom or busy living room, this article connects the engineering details to practical trade‑offs. You’ll learn how angle‑tap and angle‑drop profiles operate, how major click systems differ in lock strength and compatibility, and a straightforward DIY process that reduces common failures. We finish with material comparisons by durability and cost, maintenance tips and a short checklist to match rooms, budgets and installation style.
What Is Click Flooring and How Does Its Engineering Work?
Click flooring is a floating floor made from boards or tiles that join at profiled edges instead of being glued down. The engineered interlock spreads lateral loads across the surface while the whole floor sits on an underlay that helps control sound and moisture. Profile shapes — tongue‑and‑groove or ridge‑and‑recess — mate so panels lock under compression and resist separation, creating a continuous surface that can handle seasonal movement if correct expansion gaps are left. The aim is straightforward: speed up installation and simplify repairs while keeping dimensional stability and surface performance like scratch resistance and water protection. Understanding these mechanics explains why some systems are reusable, how underlay choice affects acoustics, and why a flat, dry substrate is essential for long‑term performance.
How Do Click Lock Flooring Systems Function?
Click lock systems convert a single insertion motion — typically an angle‑tap, angle‑drop or straight snap — into a secure mechanical joint between adjacent planks. Angle‑tap profiles need the board angled into place and tapped to engage a locking lip; angle‑drop designs allow the board to drop and seat with less tapping and fewer tools. The profile geometry uses complementary ridges and recesses to form a positive lock under compression; rigid core materials such as SPC flooring rely on tighter tolerances to avoid micro‑gaps. Because the joint is mechanical, many systems minimise or eliminate adhesives, let you reposition panels during install, and make replacing damaged sections possible without ripping up the whole floor.
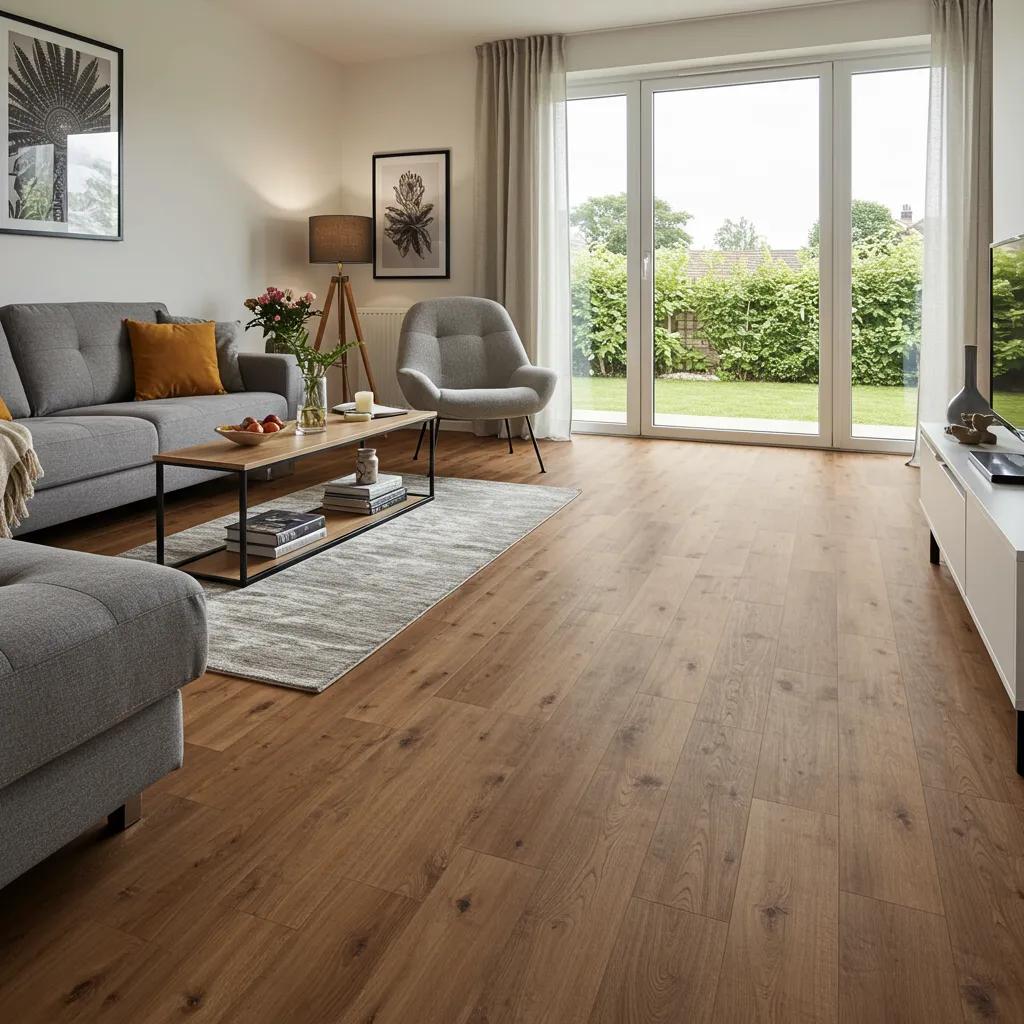
What Are the Benefits of Floating Installation in Click Flooring?
Floating installation is fast, accommodates seasonal expansion and contraction, and can often be fitted over existing floors so you avoid full demolition. Expansion gaps around the room let the floor move and prevent buckling during humidity shifts, and the floating method makes disassembly and local repairs straightforward. That said, floating floors require a flatter subfloor and careful moisture testing — problems here can produce movement or moisture migration. Underlay choice also matters: it influences sound insulation and how the floor feels underfoot, so pick an underlay that balances comfort, acoustic performance and moisture control for the space.
Which Types of Click Flooring Materials Are Engineered for Durability and Style?
Click systems combine different core constructions and wear layers with locking profiles to balance durability, water resistance, cost and appearance for specific rooms and lifestyles. Core design drives dimensional stability (rigid SPC cores), wear resistance depends on wear‑layer thickness (LVT), and refinishing potential comes from engineered wood’s real veneer. These attributes determine where each material performs best — from wet rooms to formal living spaces — and whether underfloor heating is suitable. Below is a compact comparison to make those trade‑offs easy to scan and act on.
At a glance: how common click materials compare for durability and room suitability.
| Material | Durability | Waterproofing | Cost (relative) | Ideal Rooms | Maintenance Notes |
|---|---|---|---|---|---|
| LVT (Luxury Vinyl Tile) | High (depends on wear layer) | High (waterproof) | Medium | Kitchens, bathrooms, homes with pets | Damp‑mop; avoid abrasive cleaners |
| SPC (Stone Plastic Composite) | Very high (rigid core) | Very high (waterproof) | Medium‑High | High‑traffic areas, kitchens, basements | Low maintenance; use recommended underlay |
| WPC (Wood Plastic Composite) | High (softer core than SPC) | High (water‑resistant) | Medium | Living areas, kitchens | Choose comfy underlay; avoid standing water |
| Engineered wood | Medium‑High (surface veneer) | Low‑Medium (sealed surface) | Medium‑High | Living rooms, bedrooms | Humidity control; occasional refinishing |
| Laminate | Medium | Low‑Medium (limited waterproof options) | Low‑Medium | Bedrooms, living rooms | Quick clean; keep away from excess moisture |
| Bamboo / Cork | Medium | Low‑Medium | Variable | Eco‑focused spaces, bedrooms | Use gentle cleaners; manage humidity |
The table shows LVT, SPC and WPC prioritise waterproofing and durability, while engineered wood and laminate lean toward appearance and cost effectiveness. The next section goes deeper into LVT, SPC and WPC so you can compare wear layers, core construction and pet‑friendly properties.
Once you’ve reviewed material engineering and room recommendations, most homeowners want to see product ranges and prices before deciding. Suppliers typically offer LVT, engineered wood, laminate, SPC, WPC, bamboo and cork with clear specs to match materials to room conditions. Focus on the attributes that matter — waterproofing, wear‑layer thickness or underfloor heating compatibility — to narrow your options before purchase.
What Makes Luxury Vinyl Click Flooring Ideal for Waterproof and High‑Traffic Areas?
Luxury vinyl tile (LVT) and its rigid‑core variants (SPC/WPC) deliver waterproofing through layered construction: a wear layer, a printed design layer and a waterproof core. Wear‑layer thickness (measured in microns or mils) is the main factor in abrasion resistance for busy spaces. SPC uses a mineral‑filled rigid core for excellent dimensional stability and resistance to heavy loads and indentation, while WPC mixes wood fibres and polymer for a softer, more comfortable feel at slightly lower stiffness. For homes with pets or busy kitchens, pick thicker wear‑layer LVT or an SPC with a robust surface finish to resist scratches and stains. These engineered layers explain the real‑world differences and set sensible maintenance expectations.
How Do Engineered Wood Click Flooring and Laminate Compare in Performance?
Engineered wood provides an authentic timber look with a real veneer over a multi‑ply core and can be refinished a limited number of times depending on veneer thickness. Laminate recreates wood visuals with a photographic layer under a hard wear surface and is typically replaced rather than refinished. Engineered wood usually offers higher long‑term value in formal spaces, while laminate often has a lower lifecycle cost. Moisture sensitivity differs: engineered wood needs stable humidity and is less suited to wet rooms, whereas some laminate and engineered vinyl products have better water resistance. Choose based on whether appearance or low maintenance is a higher priority for your space.
How Do Different Click Lock Systems Like 5G, Uniclic, and I4F Enhance Flooring Stability?
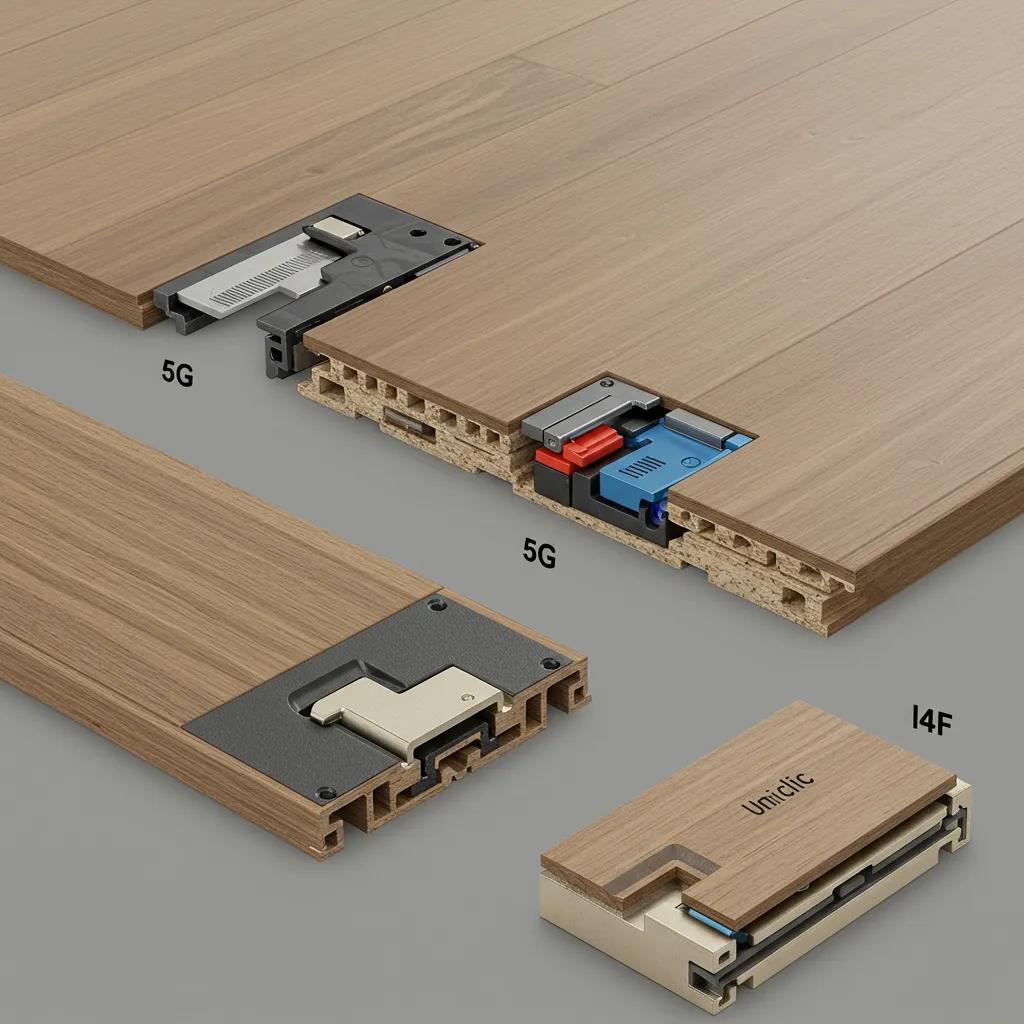
Major click systems use different mechanical approaches to lock joints, balancing installation ease with the lock strength each material needs. 5G emphasises strong horizontal locks for vinyl and rigid cores, Uniclic favours simple angle‑tap fitting for wood and laminate, and I4F offers precision geometries and wider manufacturer compatibility for robust joins. These engineering choices affect installation speed, reparability and long‑term joint behaviour, so matching the click technology to the floor type and expected traffic matters. The table below summarises the key differences.
Quick comparison of common click systems and what they’re best at.
| Click System | Mechanism | Lock Strength | Ease of Installation | Best Use Cases |
|---|---|---|---|---|
| 5G | Mechanical snap with a locking lip | High | Moderate (tapping often needed) | SPC/LVT for commercial or busy residential areas |
| Uniclic | Angle‑tap tongue‑and‑groove | Medium‑High | High (very DIY‑friendly) | Engineered wood, laminate — fast installs |
| I4F | Precision‑milled interlock for modular panels | High | Moderate (compatibility considerations) | Rigid‑core products across manufacturers |
| Proprietary variants | Various geometries | Variable | Variable | Manufacturer‑optimised applications |
The table highlights that 5G and I4F prioritise stronger mechanical locks for rigid cores, while Uniclic focuses on DIY‑friendly fitting — a popular choice for home installers. Understanding these trade‑offs leads naturally into the step‑by‑step installation process most DIYers follow.
What Are the Key Features of the 5G Click System?
5G uses a precision locking lip that snaps horizontally into place, creating a tight seam suited to rigid‑core LVT and SPC where load distribution and indentation resistance matter. It usually needs a tapping block or soft mallet to fully seat the joint, producing a strong seam that resists separation under heavy furniture and constant traffic. Manufacturers favour 5G for commercial use because the geometry limits micro‑movement and reduces joint wear over time. Knowing this helps you select compatible boards and the right tools for a durable finish.
How Does Uniclic Technology Simplify DIY Click Flooring Installation?
Uniclic works by angling the plank into the adjacent board and rotating it down to lock, which reduces heavy tapping and specialised tools — ideal for DIYers. The profile tolerates minor subfloor imperfections better than some rigid systems and speeds row‑to‑row assembly, making it popular for engineered wood and laminate. Uniclic’s simplicity also helps with reusability: planks can be unlocked and repositioned without destroying the profile, which is useful when adjusting layouts mid‑install.
What Are the Step‑by‑Step Processes for DIY Click Flooring Installation?
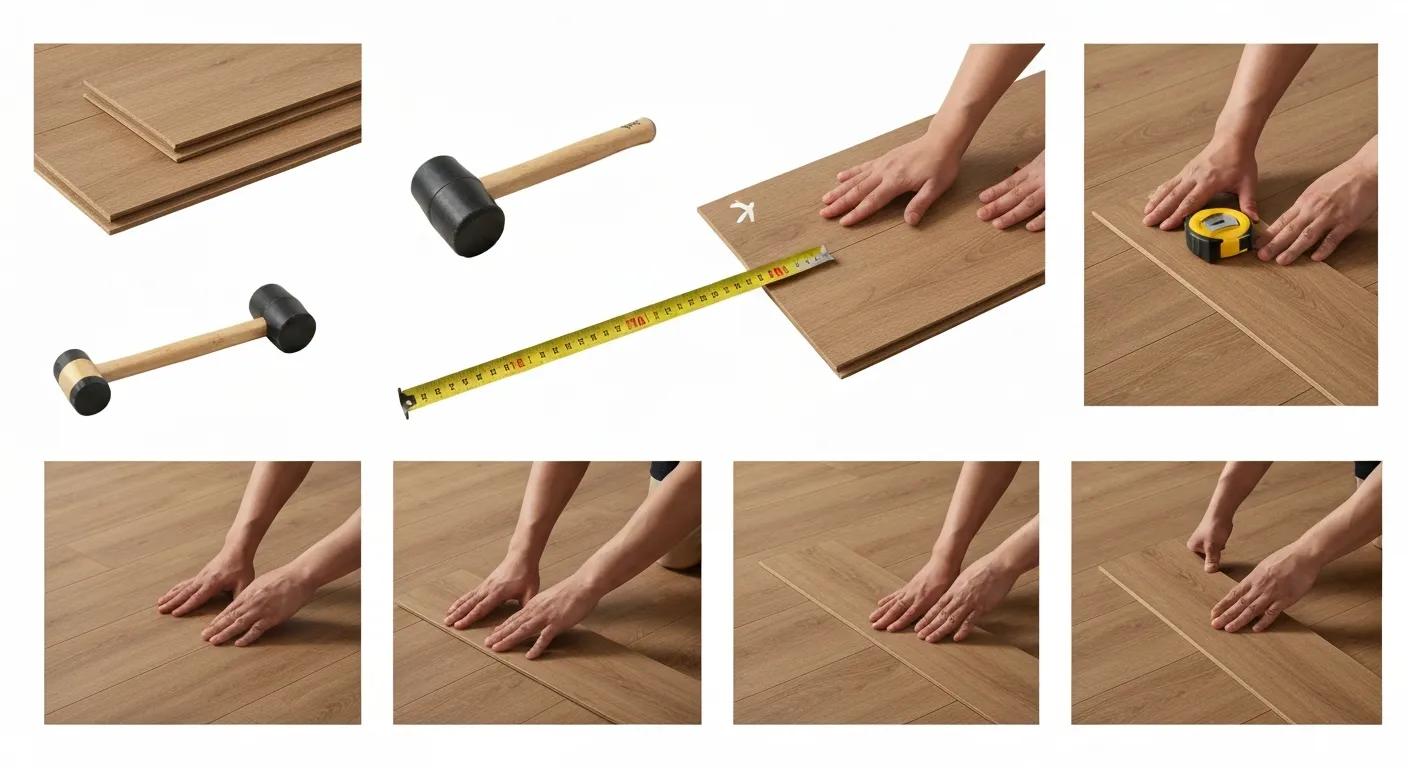
A straightforward DIY install follows a clear sequence: inspect and prepare the subfloor, acclimatise the packs, roll out underlay, lay the first rows with correct expansion gaps, stagger joints across the room, cut end pieces and finish with trims and transitions. Moisture testing, substrate flatness (measured in millimetres across a span) and the right underlay all help prevent long‑term issues like buckling or squeaks. Below is a condensed how‑to with realistic time estimates and a tools‑to‑steps table to help plan the job.
- Inspect and prepare the subfloor: Clear debris, check flatness and moisture — allow 1–3 hours depending on condition.
- Acclimatise planks: Store unopened packs in the room for 48–72 hours to stabilise — 2–3 days.
- Lay underlayment: Roll out the chosen underlay and tape seams — 1–2 hours for a typical room.
- Plan layout and snap first row: Measure, square the starting row and maintain expansion gaps — 1–2 hours.
- Install successive rows: Angle‑tap or drop‑lock planks, stagger joints as you go — 4–8 hours depending on room size.
- Cut and fit end pieces: Use the correct saw and make precise cuts for transitions — 1–2 hours.
- Fit trims and transitions: Install skirting and thresholds, allowing movement clearances — 1–2 hours.
- Clean and inspect: Remove debris and check joints and transitions for tightness — 30–60 minutes.
These steps give a realistic timeline and highlight where careful checks prevent rework. The table below maps steps to tools and timing so you can prepare materials and estimate time accurately.
Installation steps mapped to tools and timing.
| Installation Step | Tools/Supplies Required | Estimated Time & Tips |
|---|---|---|
| Subfloor prep | Moisture meter, scraper, levelling compound | 1–3 hours; fix dips over 3mm per 2m |
| Acclimatisation | None (store packs in the room) | 48–72 hours; keep packs sealed |
| Underlayment | Underlay rolls, tape | 1–2 hours; match underlay to product needs |
| Installing rows | Tapping block, rubber mallet, spacers | 4–8 hours; use spacers to keep consistent gaps |
| Trimming & finishing | Saw (jigsaw or circular), transition profiles | 1–2 hours; measure twice, cut once |
This condensed table helps you plan purchases, time and risk mitigation before you start. Next we cover the essential tools and the mistakes to avoid.
Which Tools and Materials Are Essential for Successful Click Flooring Installation?
Key items include a tapping block and rubber mallet to seat joints, spacers for consistent expansion gaps, a reliable moisture meter for subfloor checks and the right saw for accurate cuts. Underlay must match the product for sound and moisture control. Optional professional tools — track saws, pneumatic nailers for trims and a floor roller — speed the job and improve the finish but aren’t always necessary. Don’t forget safety kit like eye protection and dust masks when cutting and levelling. Choosing the correct underlay for acoustic, thermal and moisture needs completes the toolkit and helps ensure a stable floating floor.
- Having the right tools reduces the chance of lock damage and gives a neater finish.
- Optional pro tools save time but add upfront cost.
- Use safety gear when cutting and levelling — it matters.
With the right kit you’ll avoid common installation damage and achieve a tidy result; the next section highlights frequent DIY pitfalls to watch for.
What Common Mistakes Should Be Avoided During DIY Installation?
Common DIY mistakes include skipping acclimatisation, ignoring expansion gaps, installing over an uneven subfloor and using the wrong underlay — any of which can cause gaps, squeaks or buckling. Cutting planks without protecting the locking edges or forcing joints can damage profiles and complicate repairs; always use a tapping block and follow the manufacturer’s guidance. Skipping moisture tests when installing over concrete or in basements risks swelling or failure for non‑waterproof products. Catching these issues early — with moisture checks, subfloor levelling and spacers — avoids costly rework and helps keep warranties valid.
How Can You Maintain and Care for Click Flooring to Ensure Longevity?
Care routines vary by material but follow a few common rules: remove grit and debris, avoid standing water on moisture‑sensitive surfaces and use manufacturer‑approved cleaners to protect wear layers and finishes. Regular sweeping or vacuuming removes abrasive particles, and damp mopping with a neutral pH cleaner maintains appearance without harming seals or veneers. On floating floors, check expansion gaps and transitions for loosening and replace damaged planks promptly where possible. The sections below list cleaning tips for LVT and engineered wood and offer troubleshooting for common issues.
What Are the Best Cleaning Practices for Luxury Vinyl and Engineered Wood Click Floors?
For luxury vinyl, sweep or vacuum regularly and use a damp mop with a pH‑neutral cleaner; avoid solvent‑based products and steam cleaners that can damage the wear layer or seams. Engineered wood responds best to dry cleaning and occasional damp mopping with wood‑safe solutions — never saturate the floor, as moisture can reach seams and harm the veneer. Add felt pads under furniture and place mats at entrances to reduce grit. Gentle, regular care preserves the finish and helps keep manufacturer warranties valid when you use recommended products.
How Do You Troubleshoot Common Issues Like Squeaking or Gaps in Click Flooring?
Start by isolating the source of squeaks: subfloor irregularities, poor underlay or loose joints are common culprits. Minor squeaks often respond to tightening trims or re‑seating a board. Gaps usually stem from incorrect acclimatisation, humidity swings or missing expansion gaps — fix by re‑laying affected rows if possible or using gap fillers specified for floating floors. Buckling points to trapped moisture or insufficient expansion allowance and may need partial removal to relieve pressure and address subfloor moisture. If DIY fixes don’t help, call a professional to assess whether plank replacement or subfloor remediation is required.
How Do You Choose the Right Click Flooring System for Your Home and Budget?
Choosing well means matching room use, traffic levels, moisture exposure, pet needs and installation preference to the material and click technology that best meet those demands. Prioritise waterproof SPC/LVT for kitchens and bathrooms, pick engineered wood for authentic looks in living and dining areas, and choose Uniclic‑style systems for straightforward DIY installs. Check underfloor heating compatibility, expected lifecycle and refinishing options, and consider total cost of ownership — including maintenance and likely replacement timing — so you balance short‑term savings with long‑term value. The checklist below helps you prioritise features and make a confident selection.
A quick decision checklist to match features to needs:
- Room and moisture: Use waterproof SPC/LVT in wet areas; choose engineered wood where humidity is controlled.
- Traffic and pets: Choose thicker wear layers and rigid cores in high‑traffic, pet‑friendly homes.
- Installation preference: Pick Uniclic or similar angle‑tap systems for DIY ease; choose 5G/I4F for higher lock strength.
- Budget and lifecycle: Weigh upfront material cost against refinishing potential and expected replacement intervals.
This checklist ties material properties to real use cases and helps you prioritise features when comparing products and installers. To move from decision to action, follow the practical guidance below.
We aim to give clear, practical information so you can compare a wide range of flooring options and prices with confidence. Focus on ranges that meet your priorities — waterproofing, wear‑layer thickness, underfloor heating compatibility — and include installation choices when judging long‑term value.
What Factors Should Influence Your Choice Between LVT, SPC, WPC, and Engineered Wood?
Match material traits to what matters most: LVT balances looks and waterproofing at a moderate price; SPC offers superior rigidity and indentation resistance; WPC gives extra underfoot comfort with good water resistance; engineered wood provides an authentic finish with limited refinishing. Check underfloor heating compatibility — use materials and adhesives that are explicitly approved — and factor in subfloor prep costs, which can affect the overall budget. Consider scratch and indentation resistance for furniture‑heavy rooms or homes with pets, and weigh the long‑term value of refinishing against short‑term savings.
How Does Cost‑Effectiveness Compare Between DIY Installation and Professional Services?
DIY saves on labour but raises the risk of mistakes — incorrect expansion gaps or uneven subfloors can lead to premature failures and hidden costs. Professional installation increases upfront spend but reduces risk and can preserve manufacturer warranties. Simple, regular rooms are often suitable for DIY; complex patterns, large areas or tricky transitions usually justify hiring an installer. Include tool rental or purchase and your available time when estimating costs, and add a contingency for possible rework. Base your choice on warranty requirements, time availability and your tolerance for risk.
We provide practical, impartial guidance so you can compare products against the attributes discussed here, include likely installation costs in your lifecycle estimate, and select the flooring that fits your room needs and long‑term maintenance plans.


