The Ultimate Flooring Survival Guide for DIY Beginners

Choosing the perfect flooring can completely transform a room's aesthetic, durability, and ease of installation from the outset. This DIY flooring guide offers straightforward advice on selecting the most beginner-friendly surfaces, gathering essential tools, preparing your subfloor, tackling the installation process, and keeping your new floor looking its best. You'll discover which flooring types are ideal for each area of your home, how to resolve common issues, and where to source top-quality materials without overspending. For an extensive selection at brilliant prices, explore Stories Flooring – The UK's Top Online Flooring Shop. Let's get started and explore the best flooring options for DIY beginners across the UK.
What Are the Best Flooring Types for DIY Beginners in the UK?
For those new to DIY flooring, laminate, luxury vinyl tile (LVT), and engineered wood flooring are typically the top choices. They often feature user-friendly click-lock systems, offer excellent water resistance, and provide a realistic appearance without requiring specialised tools. These options strike an excellent balance between affordability, resilience, and straightforward installation as a floating floor, allowing you to save on labour costs and complete a project within a single weekend.
Homeowners favour flooring that:
- Is simple to install with click-lock or tongue-and-groove designs
- Withstands daily wear and tear in high-traffic areas
- Is budget-friendly for home renovations
Once these criteria are met, it's time to compare specific flooring types and assess their suitability for a DIY approach.
Which Flooring Options Are Easiest to Install Yourself?
Most DIY enthusiasts can achieve a professional finish using flooring designed for floating installation. This category includes click-lock laminate, LVT planks, and modular carpet tiles, which require minimal adhesive and no complex joinery skills.
- Laminate planks with a bevelled click edge securely lock together without the need for glue.
- LVT beautifully mimics the look of wood or stone with an easy-to-fit floating plank system.
- Carpet tiles either interlock or adhere with a simple peel-and-stick backing for rapid laying.
Each of these choices minimises the need for intricate cutting and fitting, thereby reducing the likelihood of gaps or uneven seams. Understanding their distinctions will empower you to make the most informed final decision.
DIY Flooring Installation: A Step-by-Step Guide for Homeowners
Laminate, Luxury Vinyl Tile (LVT), and engineered wood are popular choices for DIY flooring projects due to their ease of installation, often featuring click-lock or tongue-and-groove systems. Successful DIY installation requires careful preparation, including acclimating materials and ensuring proper expansion gaps, to avoid common issues like buckling or gaps.
This citation validates the article's recommendations for DIY-friendly flooring types and reinforces the importance of following correct installation procedures to prevent common mistakes.
How Do Laminate, Luxury Vinyl Tile (LVT), and Engineered Wood Compare for DIY?
Here's a detailed comparison of three leading flooring types that are excellent for DIYers, covering their installation methods and key advantages.
| Flooring Type | Installation Method | Key Benefit |
|---|---|---|
| Laminate | Click-lock floating | Excellent scratch resistance and budget-friendly options |
| Luxury Vinyl Tile | Click-lock or glue-down | Waterproof performance, ideal for kitchens and bathrooms |
| Engineered Wood | Tongue-and-groove floating | Authentic wood appearance with superior stability compared to solid wood |
Laminate stands out as the most cost-effective option, LVT is the premier choice for areas susceptible to moisture, and engineered wood offers a premium aesthetic with a more straightforward installation process than traditional solid wood planks. Next, we'll explore which flooring types are best suited for various rooms within your home.
What Flooring Types Are Suitable for Different Rooms in Your Home?
Selecting the appropriate flooring for each room ensures both aesthetic appeal and longevity. This table suggests the most suitable flooring for various areas in your home.
| Room | Recommended Flooring | Reason |
|---|---|---|
| Living Room | Engineered Wood or Laminate | Offers a warm ambiance, feels stable underfoot, and handles high traffic effectively |
| Kitchen | Waterproof LVT | Resists spills and is exceptionally easy to clean |
| Bathroom | Glue-down Vinyl Tile | A waterproof seal provides essential protection against moisture damage |
| Hallway & Utility | Durable Laminate | Resists scratches and is simple to maintain |
Aligning your flooring choice with the room's specific use will prevent premature wear and maximise your investment. Once you've selected the ideal material, you'll need the correct tools and supplies to ensure a precise and enduring finish.
Which Eco-Friendly Flooring Options Are Available for DIY Projects?
Sustainable materials can significantly reduce your environmental impact without complicating the installation process:
- Cork Planks feature a convenient click-lock system and provide natural warmth and excellent sound insulation.
- Bamboo Flooring is a floating floor option crafted from a rapidly renewable resource.
- Reclaimed Wood Panels can be installed using floating joist systems, offering a unique and characterful aesthetic.
Eco-friendly floors combine attractive aesthetics with environmental responsibility, preparing you for the subsequent stages: inspecting and preparing your subfloor.
What Essential Tools and Materials Do You Need for DIY Flooring Installation?
Achieving a perfectly fitted DIY floor hinges on accurate measurements, clean cuts, and precise alignment. Having all the necessary tools and supplies readily available beforehand will prevent delays and help you attain a professional-quality outcome.
What Are the Must-Have Measuring and Cutting Tools for Flooring?
Precise measurements and neat cuts are dependent on having the right equipment:
- A high-quality tape measure with clear markings ensures accurate plank lengths.
- A sharp utility knife is ideal for scoring vinyl and LVT to achieve clean, straight edges.
- A jigsaw is indispensable for making those intricate cuts around pipes and door frames.
Having these tools at hand will minimise material waste and ensure your panels fit together seamlessly, leading us to the essential installation aids.
Which Installation Aids Help Achieve a Professional Finish?
Beyond cutting, achieving tight joints and consistent expansion gaps requires specific accessories:
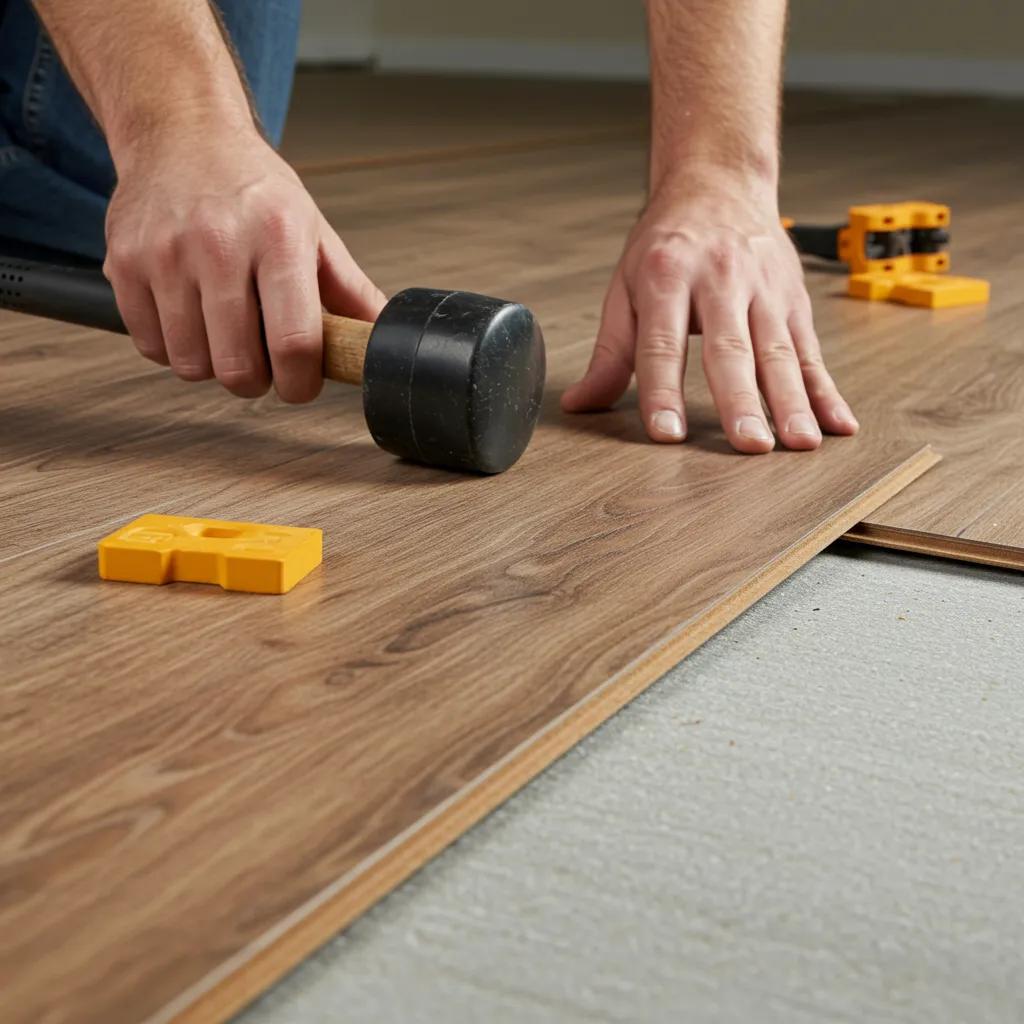
- A rubber mallet is used to gently tap planks into place without causing damage to their edges.
- Spacers are vital for maintaining the correct expansion gap around walls, preventing the floor from buckling.
- A pull bar is employed to lock the final row of planks when direct tapping is not feasible.
These aids significantly simplify the process of achieving proper alignment, ensuring a uniform finish across the entire floor.
What Underlay and Subfloor Preparation Materials Should You Use?
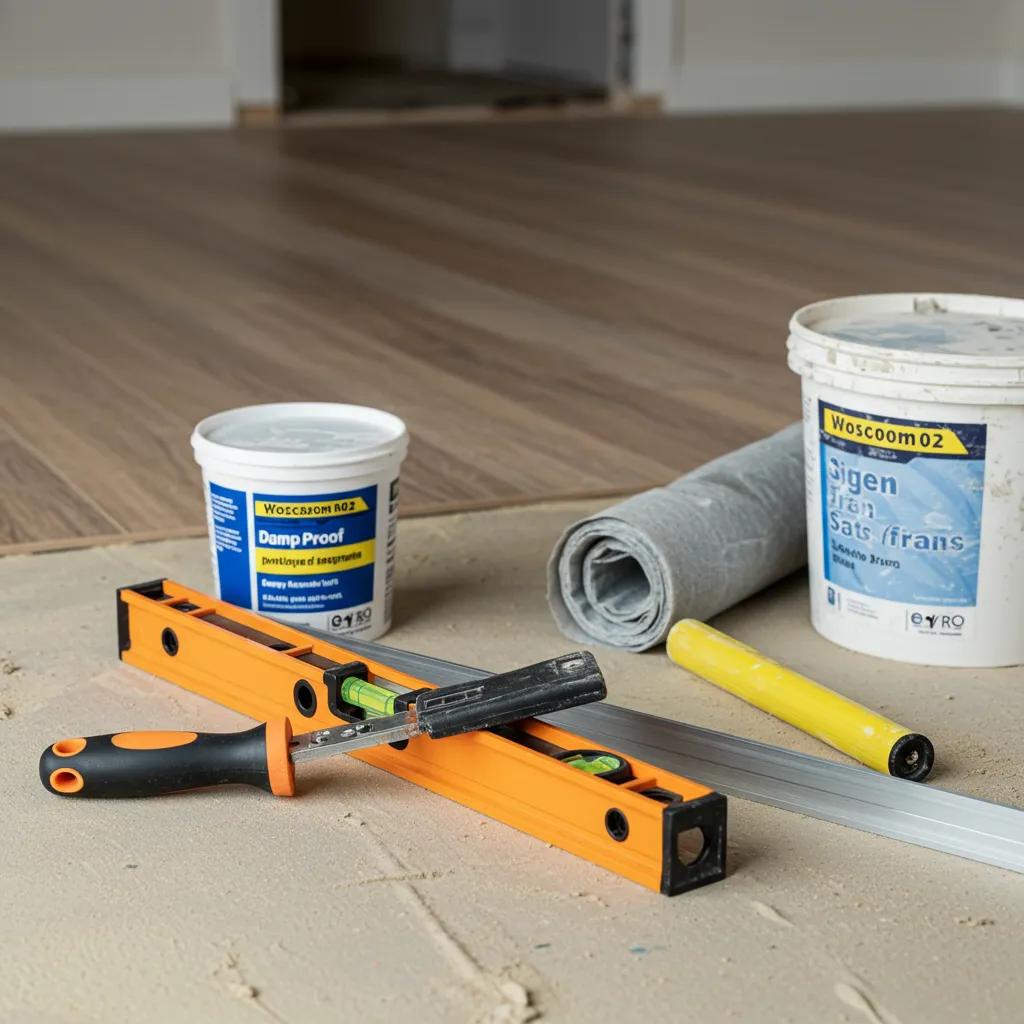
The correct underlay and a moisture barrier are fundamental to creating a stable and comfortable floor:
- Acoustic underlay helps to minimise impact noise, proving particularly useful under laminate or LVT.
- A damp proof membrane (DPM) shields engineered wood from any residual moisture present in the subfloor.
- Levelling compound is used to fill any low spots, ensuring a perfectly flat base for your flooring.
Thorough subfloor preparation is paramount to preventing squeaks, uneven wear, and premature failure, laying the groundwork for a flawless installation.
How Do You Prepare Your Subfloor for a Successful DIY Flooring Installation?
For your new floor to offer lasting performance and durability, the subfloor must be clean, level, and dry. A meticulous inspection and any necessary corrections form the bedrock of any successful flooring system.
The Importance of Subfloor Preparation for Flooring
Proper subfloor preparation is crucial for the longevity and performance of any flooring installation, preventing issues such as installation failure, structural damage, uneven wear, and premature failure. It ensures the surface is clean, level, and dry, directly impacting the durability and appearance of the finished floor.
This research directly supports the article's detailed section on preparing the subfloor, emphasizing its critical role in achieving a lasting and professional finish.
How Do You Check and Ensure Subfloor Levelness and Cleanliness?
Begin by clearing all debris and thoroughly vacuuming the entire area. Employ a long spirit level or a straightedge to detect any dips or high spots – any deviation exceeding 3 mm over a 2-metre span requires attention. Mark these areas and apply a smoothing compound to level them. This step is essential to prevent uneven boards and visible ridges beneath your new flooring.
What Are the Best Methods for Moisture Testing and Damp Proofing?
Utilise a hygrometer or a calcium chloride test kit to ascertain the moisture content of your subfloor. If the readings exceed recommended levels (for instance, over 2% moisture for concrete), you must install a DPM or apply a brush-on primer to seal it. Effective damp proofing is critical to prevent boards from cupping or adhesive from failing.
Why Is Acclimatisation Important and How Long Should It Take?
It is imperative to allow your flooring materials to adjust to the ambient temperature and humidity of the room before commencing installation. Lay unopened packs flat for a minimum of 48 hours. This process enables the moisture content within the planks to stabilise, significantly mitigating the risk of expansion or shrinkage post-installation, thereby ensuring your joins remain tight and gap-free throughout the fitting process.
What Are the Step-by-Step Installation Processes for Popular DIY Flooring Types?
Adhering to the correct procedures for each flooring type will yield consistent, professional results. The following sections provide clear, actionable steps that are easy to follow.
How to Install Click-Lock Laminate Flooring Yourself
- Unroll the underlay and trim it to fit snugly against the perimeter walls.
- Position spacers around the edges to maintain a 10 mm expansion gap.
- Angle the tongue of the new plank into the groove of the preceding one at approximately 20°, then press down firmly to secure the lock.
- Use a rubber mallet and a tapping block to gently tap the plank, ensuring a flush joint.
- Continue laying planks row by row, ensuring end joints are staggered by at least 30 cm for enhanced stability.
This method employs floating floor construction to create a stunning laminate floor that can be completed in just a few hours.
How to Lay Luxury Vinyl Tiles (LVT) with a Click-Lock System
- Confirm that your subfloor is smooth and level, and lay an underlay if recommended.
- Set up your spacers and commence in a corner, locking the planks together at a shallow angle.
- Connect the shorter end joints first, then secure the long sides into place with a gentle tap.
- Utilise a utility knife to trim the planks around the perimeter for a neat finish against the walls.
- Once installation is complete, remove the spacers and fit your skirting or trim.
LVT's waterproof core and straightforward click system make it an exceptional choice for areas where moisture is a concern.
How to Install Floating Engineered Wood Flooring
- Verify the moisture levels in your subfloor and lay a suitable underlay, preferably one with DPM properties.
- Position the first plank with the tongue facing outwards, ensuring a 12 mm gap is maintained around the entire perimeter.
- Fit subsequent planks by angling them into place and gently tapping them together using a pull bar.
- Stagger the end cuts by a minimum of 25 cm to ensure the floor's structural integrity.
- Conclude by fitting scotia or beading against the skirting boards to conceal the expansion gaps.
Engineered wood requires careful acclimatisation, but it delivers the authentic look and feel of genuine hardwood flooring.
How to Lay Carpet Tiles for Easy DIY Flooring
- Ensure the subfloor is completely clean and dry.
- Use a chalk line to mark the centre of the room and position your first tile there.
- Peel off the backing and press each tile firmly into place, aligning the edges perfectly.
- Cut edge tiles with a utility knife for a clean finish around the room's perimeter.
- Use a heavy roller over the entire area to ensure all tiles are securely adhered.
Installing modular carpet tiles allows for rapid, creative layouts with minimal tools required.
What Are Common Installation Mistakes to Avoid?
- Neglecting expansion gaps can lead to the floor buckling as the boards expand.
- Failing to level the subfloor properly can result in uneven wear and audible creaking.
- Staggering joints too closely can compromise the overall structural integrity of a floating floor.
- Omitting the acclimatisation process can cause warping or gaps after fitting.
Avoiding these common errors will help you achieve a smooth, durable floor finish that maintains its aesthetic appeal for years to come.
How Do You Maintain and Care for Your New DIY Floor?
Regular cleaning and diligent care will ensure your new floor retains its pristine appearance and extends its service life. Each flooring type benefits from specific cleaning and protection methods.
What Are the Best Cleaning Practices for Laminate, LVT, and Wood Floors?
Sweep or vacuum daily to remove abrasive grit that can cause scratches. A weekly damp mop with a pH-neutral cleaner will maintain the brightness of finishes without leaving any residue. For wood floors, use a microfibre mop to prevent excess water, and for LVT, opt for a cleaner specifically formulated for vinyl to preserve its slip resistance.
How Do You Remove Stains and Protect Your Flooring from Damage?
Blot up spills immediately to prevent them from penetrating the surface. Use the appropriate stain remover for the specific issue – laminate cleaners for laminate, and wood floor polish for engineered planks. Attach felt pads to furniture legs to prevent indentations and use doormats to trap dirt at entry points.
Which Products Are Safe and Recommended for Different Flooring Types?
- Laminate: Use pH-neutral cleaners that leave no residue.
- LVT: Select vinyl-specific cleaners that protect the wear layer.
- Engineered wood: Choose oil-based wood floor cleaners that are silicone-free.
Employing the correct products will prevent the finish from dulling and avert chemical damage, ensuring your floor maintains its inherent beauty.
What Are the Most Common DIY Flooring Problems and How Can You Fix Them?
Even the most meticulously planned projects can occasionally encounter unforeseen issues. Prompt identification and repair will ensure your floors continue to look and perform optimally.
How to Address Uneven Subfloors and Gaps at Edges
For minor imperfections, apply a fast-setting levelling compound and sand it smooth once dry. Gaps at the edges typically arise if spacers were removed prematurely; carefully reinsert them or trim the final row of planks to ensure the correct expansion allowance, and use caulk if necessary for a neat finish.
What to Do When Planks Don’t Fit or Warp?
Warped planks usually indicate underlying moisture issues; replace any affected boards after rectifying the subfloor's moisture problem. If planks prove difficult to fit, you can gently bevel the edges with sandpaper to facilitate easier locking. Always use straight, undamaged planks for your installation.
How Can You Repair Scratches, Dents, and Buckling?
For minor scratches, use a wood-fill paste that closely matches the colour of your planks. Dents on wood floors can sometimes be rectified by placing a damp cloth over them and gently applying a warm iron. If your floor is buckling, relieve any pressure from the expansion zones and re-lay the boards with the appropriate gap spacing to restore a flat surface.
Where Can You Find Quality DIY Flooring Products and Accessories at the Best Prices?
Selecting a reputable supplier ensures consistent product quality, expert guidance, and efficient delivery for your project.
Why Choose Stories Flooring’s Lusso Range for DIY Projects?
Stories Flooring's Lusso Range features click-lock laminate, waterproof LVT, and engineered wood at exceptional online prices, all supported by 25 years of industry expertise. Their discounted branded floors combine stylish, high-end aesthetics with straightforward DIY fitting, offering both superior style and complete peace of mind.
Which Flooring Tools and Accessories Are Available for DIY Installation?
You can find a comprehensive selection of tape measures, utility knives, spacers, pull bars, and levelling compounds, all chosen for their durability and precision. These accessories are designed to integrate seamlessly with Lusso flooring profiles, ensuring a smooth and cohesive installation experience.
How Does Nationwide Delivery Support Your DIY Flooring Project?
Stories Flooring provides delivery directly from their Leeds facility to any location across the UK, utilising discreet and secure packaging. With nationwide delivery, your flooring and tools will arrive punctually, keeping your project on track and within budget.
Embarking on a DIY flooring project need not be daunting. With the right materials, methods, and expert support, you can bestow any UK home with a stunning, professionally finished floor.
About The Author